Windows Defender is an in-built antivirus for Windows 10 that scans your system in the background by default, for any threats. It analyzes all the downloads that you do, using web browsers like Chrome, Edge, etc. This process leads to high CPU usage. So, how do you prevent Windows Defender to use too much CPU? We have listed two methods below by which you can limit the CPU usage by Windows Defender on Windows 10.
Method 1 – Setting a LImit for Windows Defender CPU Usage using PowerShell
Step 1: Press Windows key + X together on the keyboard to open the context menu. Click on Windows PowerShell (Admin) to open the PowerShell command window.

Step 2: On the PowerShell command window run the below command. This will show the current maximum limit for the CPU usage for Windows Defender.
Get-MpPreference | select ScanAvgCPULoadFactor
In this case, it shows 50, which means it’s set at 50% by default.
Step 3: To lower the CPU usage limit for Windows Defender, execute the below command. In this case, we have changed it to 30, which means, Windows Defender will not use more than 30% of your CPU.
Set-MpPreference -ScanAvgCPULoadFactor 30

Method 2 -Setting a LImit for Windows Defender CPU Usage using Registry Editor
Step 1: Press Windows key + R to open the Run box. Type Regedit in the box and press the OK button to open the Registry Editor window.

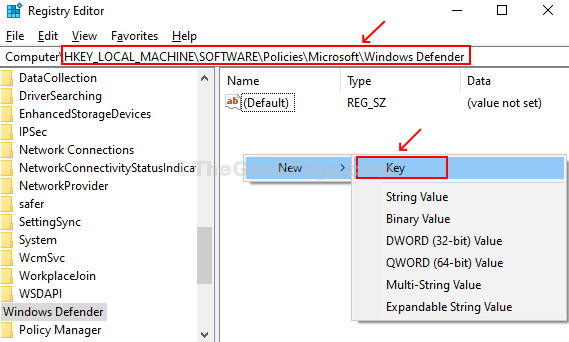
Step 2: In the Registry Editor window, navigate to the below path:
HKEY_LOCAL_MACHINE\SOFTWARE\Policies\Microsoft\Windows Defender
Now, right-click on the empty pane on the right-hand side of the window, click on New, and click on Key.

It creates a new sub-key folder. Name it Scan.
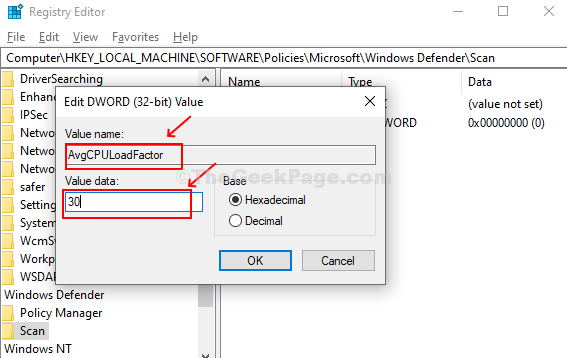
Step 3: Next, right-click on the newly created Scan folder (sub-key), click on New, and click on DWORD (32-bit) Value.

Step 4: Name the DWORD Value as AvgCPULoadFactor, double-click on it to edit the CPU usage limit for Windows Defender to 30 and press the OK button to save the changes.

Close the Registry Editor and reboot your system to check if Windows Defender CPU usage has reduced or not.

No comments:
Post a Comment