While one of the most crucial applications on the Windows OS, Windows update is also the buggy one. Of the many errors with Windows update, a well-known one is:
Windows Update cannot currently check for updates, because the service is not running. You may need to restart your system.
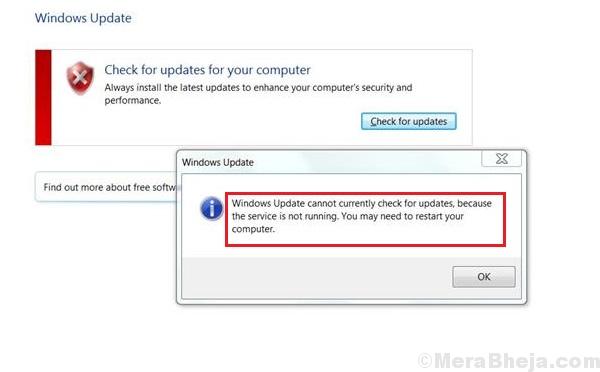
As the error suggests, the user should try restarting the system if it helps. Usually, it won’t.
Cause
The cause is simple: The “Windows update service” did not start. However, the reasons the service did not start could be many.
Try the following steps one by one if it helps:
Solution 1] Restart the Windows update service
1] Press Win + R to open the Run window. Type the command services.msc and press Enter to open the Service Manager.
2] In the list, which is arranged in alphabetical order, locate the Windows update service. Right-click on it and then click on Restart.
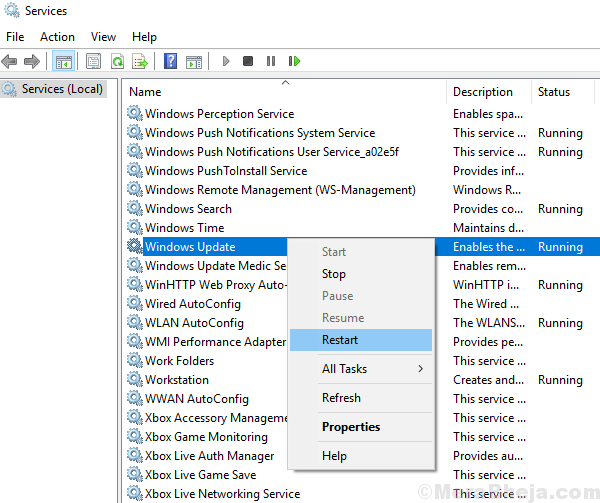
3] Reboot the system and check if it helps.
Solution 2] Manually Start the service
1] Press Win + R to open the Run window. Type the command services.msc and press Enter to open the Service Manager window.
2] Locate the Windows update service, right-click on it and select Properties.
3] Change the Startup type to manual and click on Start.
4] Click on Apply and then OK. Make sure that the Service status says “Running.”
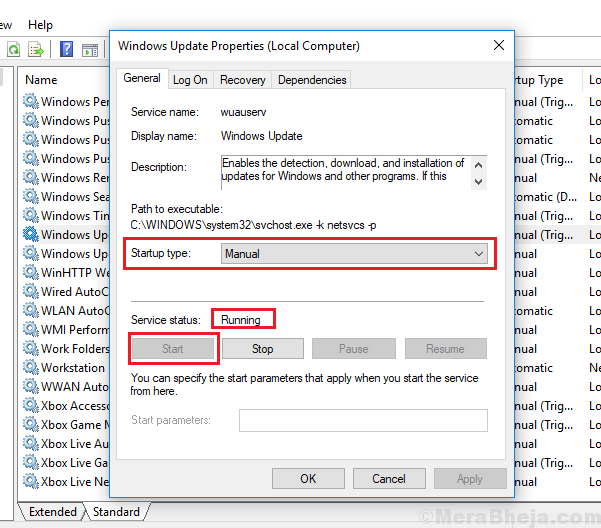
Now, without restarting the system, try running the Windows update. Since the service is running, we shouldn’t get the error. Once the system has updated, the issue might get resolved for future as well (since Microsoft keeps pushing fixes through Windows updates).
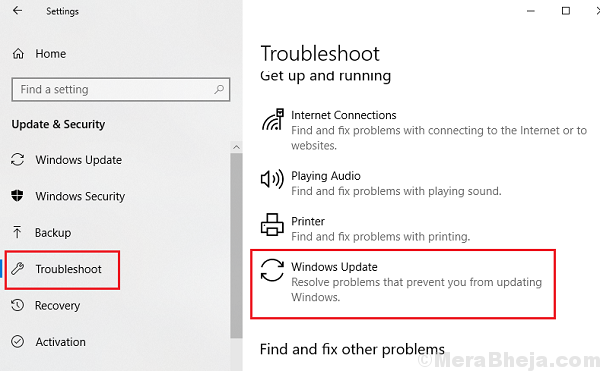
Solution 3] Run the Windows Update troubleshooter
1] Click on the Start button and then the gear-like symbol to open the Settings page.
2] Go to Updates and security and then to the Troubleshoot tab.
3] Select the Windows update troubleshooter and Run it.
Solution 4] Update the Intel Rapid Storage Technology driver
Updating the Intel Rapid Storage Technology driver could be helpful if the above-mentioned steps failed. Here’s the procedure to update a Windows driver.
Solution 5] Reregister Windows Update Files
Re-registering the Windows update .dll files would help fix the issue if nothing else did.
Note: Please create a backup or restore point for your system before attempting this fix.
1] Search for Command Prompt in the Windows search bar. Right-click on the icon and select Run as administrator.
2] Type the following commands in the administrative Command Prompt one by one and press Enter after each command:
regsvr32 wuapi.dll
regsvr32 wuaueng.dll
regsvr32 wups.dll
regsvr32 wups2.dll
regsvr32 wuwebv.dll
regsvr32 wucltux.dll

3] Exit Command Prompt after all these command have executed and reboot the system.
We hope this exhaustive troubleshooting guide would be helpful in fixing the issue.
No comments:
Post a Comment