|
Shortcut
|
Function
|
|
Windows Key + C
|
Displays Charms menu.
|
|
Windows Key + X
|
Brings up a menu of advanced system options, including Windows
Control Panel, Command Prompt, Task Manager and File Explorer.
|
|
Windows Key + I
|
Displays the Settings menu for the current app. For example, if
you’re in Internet Explorer 10, this key shows Internet options. If you’re on
the Start menu, it shows general OS settings.
|
|
Windows Key + Q
|
Brings up the apps search menu that allows you to search your
list of installed programs.
|
|
Windows Key + D
|
Activates desktop mode.
|
|
Windows Key + Tab
|
Brings up the Task Switcher and toggles between Windows 8-style
apps.
|
|
Windows Key + H
|
Brings up Share menu for the current app. For example, hitting
Windows Key + H in Bing Maps, lets you email or share map information on
social networks.
|
|
Windows Key + M
|
Opens desktop mode and minimizes all windows.
|
|
Windows Key + W
|
Opens universal search menu and sets it to search settings.
|
|
Windows Key + F
|
Opens universal search menu and sets it to search files.
|
|
Windows Key + R
|
Opens Run menu where you can launch programs by typing in their
executable file names.
|
|
Windows Key + E
|
Opens File Explorer to the “My Computer” view which shows all
your drives.
|
|
Windows Key +Number Key (1-9)
|
Switch to desktop mode and make the Nth application on the task
bar active where N is the number key you hit and 1 is the furthest taskbar
icon to the left.
|
|
Windows Key + . (period key)
|
Docks the current Windows 8-style application to the right or
left, depending on how many times you hit it.
|
|
Windows Key + Z
|
Brings up app menu, which shows contextual options for the
active app.
|
Sunday, 28 April 2013
Quicker & easier way to access various features of Windows 8
Bypass Office 2013 streming installation
· 1 Navigate to http://www.office.com/myaccount and
sign in.
· 2 Click on “Install from a disc” under Account
Options
· 3 Select “I want to burn a disc, then click on the
Download button.
4 Once the download completes, mount the .img file
and double click on the icon for setup.exeFixing App Issues in Windows 8
In case if you get error messages
while opening the apps. Please download the windows app troubleshooter from
this link :
; and run it…!
Restart the computer and the app problem should be fixed.
Dell 966 Printer Installation on Windows 8
While
working with a Dell 966 Printer installation with Windows 8 please try the
following steps which have worked on many occasions. Though the printer is not
compatible with windows 8, we can still attempt the following steps to make it
work.
1.
Download
the printer removal utility and run it to ensure the removal of any traces of
previous installation on the system for the printer : http://www.dell.com/support/drivers/us/en/19/DriverDetails/Product/dell-966?driverId=R152277&osCode=WV64&fileId=2731117043&languageCode=EN
2.
Restart
the system after the removal and remove the device from the devices and printer
list in the control panel if it is there.
3.
Download
the Vista (X86 or X64 as per the OS architecture) driver instead of Windows 7
driver on the system and extract it in compatibility mode with Vista.
4.
Attempt
the installation also in compatibility mode with Vista.
There
are good chances that the procedure will work and will allow the installation
of the printer with windows 8.
NOTE:
It is imperative to keep the customer aware of the printer being incompatible
with windows 8 and that the you will attempt the installation on “Best Effort”
basis
Unable to restart Post updating Windows update----Update 1
On
Windows 7 :
Issue
: You
receive an Event ID 55 or a 0xc000021a Stop error in Windows 7 after you
install security update 2823324
Solution
Steps: http://support.microsoft.com/kb/2839011
On
Windows 8 :
In
case you end up with No boot issue post installing the Windows update , please
follow the below steps
Try
crashing the system by powering off at the Dell Logo to invoke the recovery
options ,
1 Click next when you get Language options
2 Choose repair below the Install Button
3 Click Advanced troubleshooting steps
4 Click Command Prompt
5 Use the below commands to remove KB2808735
Dism /image:C:\ /get-packageinfo
/PackageName:Package_for_KB2808735~31bf3856ad364e35~amd64~~6.2.1.3 (to list is package is present)
dism /image:C:\ /remove-package
/PackageName:Package_for_KB2808735~31bf3856ad364e35~amd64~~6.2.1.3 (to remove the package)
If
the system is booting up
Go
to the control panel and remove the KB2808735
Reset Windows Update History.bat
Came across an issue I was not able to install windows
updates and getting error (80070003).
Now you cannot run Microsoft fixit on windows 8 so I got this
utility which you can run and fix this issue.
Download it from the link below.
Reset_Windows_Update_History.bat
2. Save the .bat file to your Desktop.
3. Right click or press and hold on the downloaded .bat file, and click/tap on Run as administrator.
4. If prompted by UAC click/tap on Run, then Yes/Continue (if administrator) or type in administrator's password (if standard user).
5. You will now see an elevated command prompt open and run. When it's finished, it will close automatically.
6. Restart the computer afterwards and then re-download the updates.
Error installing Office 2013 from OEM link
When
attempting to install Microsoft Office 2013, you may receive an error that
says ”Windows cannot find C:\Program Files\Microsoft Office
15\clientx64\integratedoffice.exe“(screenshot below). To fix this problem,
follow these steps.
1.
Select Start, type regedit, then pressEnter.
2. Navigate to the following location.
§ HKEY_LOCAL_MACHINE
§ SOFTWARE
§ Microsoft
§ Office
3.
Delete the 15.0 folder.
Now restart the computer and try to install Office 2013 again.
You should be able to make it through without the error message interrupting
your progress.

Another way to fix this, run the MS fix it with the link below.
Print Spooler issues
Issue: Print spooler missing in services.msc
1. Go to Programs and Features in
Control panel > click Turn Windows features on or off
2. click + sign of Print services
3. Select LPD and LPR. You should remove Internet Printing Client.
> restart your PC to ensure there is no error of spooler service.
4. Add your printer driver again.
If print Spooler still does not appear in Services, SFC /Scannow
can be tried as well as there are advanced registry fixes that can be attempted
like the one below:
PRINT
SPOOLER
Issue: Print spooler missing in services.msc
Troubleshooting
If the print spooler entry in missing in service, Copy the file
below and paste it into a notepad and name file spooler.reg on desktop and then
double click on it.
It will create all the entries in registry and you will be able to
find spooler entry in services.msc
Note: You need to restart the computer.
Windows Registry Editor Version 5.00
[HKEY_LOCAL_MACHINE\SYSTEM\CurrentControlSet\Services\Spooler]
"DependOnService"=hex(7):52,00,50,00,43,00,53,00,53,00,00,00,00,00
"Description"="Loads files to memory for later printing."
"DisplayName"="Print Spooler Service"
"ErrorControl"=dword:00000001
"FailureActions"=hex:80,51,01,00,00,00,00,00,00,00,00,00,03,00,00,00,e8,47,0c,\
00,01,00,00,00,60,ea,00,00,01,00,00,00,60,ea,00,00,00,00,00,00,00,00,00,00
"Group"="SpoolerGroup"
"ImagePath"=hex(2):25,00,53,00,79,00,73,00,74,00,65,00,6d,00,52,00,6f,00,6f,00,\
74,00,25,00,5c,00,73,00,79,00,73,00,74,00,65,00,6d,00,33,00,32,00,5c,00,73,\
00,70,00,6f,00,6f,00,6c,00,73,00,76,00,2e,00,65,00,78,00,65,00,00,00
"ObjectName"="LocalSystem"
"Start"=dword:00000002
"Type"=dword:00000110
[HKEY_LOCAL_MACHINE\SYSTEM\CurrentControlSet\Services\Spooler\Parameters]
[HKEY_LOCAL_MACHINE\SYSTEM\CurrentControlSet\Services\Spooler\Performance]
"Close"="PerfClose"
"Collect"="PerfCollect"
"Collect Timeout"=dword:000007d0
"Library"="winspool.drv"
"Object List"="1450"
"Open"="PerfOpen"
"Open Timeout"=dword:00000fa0
"WbemAdapFileSignature"=hex:ee,77,f6,e4,05,9a,12,60,ce,fa,84,c7,a3,a5,c1,a1
"WbemAdapFileTime"=hex:00,99,f6,d2,64,9a,c4,01
"WbemAdapFileSize"=dword:00023e00
"WbemAdapStatus"=dword:00000000
[HKEY_LOCAL_MACHINE\SYSTEM\CurrentControlSet\Services\Spooler\Security]
"Security"=hex:01,00,14,80,90,00,00,00,9c,00,00,00,14,00,00,00,30,00,00,00,02,\
00,1c,00,01,00,00,00,02,80,14,00,ff,01,0f,00,01,01,00,00,00,00,00,01,00,00,\
00,00,02,00,60,00,04,00,00,00,00,00,14,00,8d,01,02,00,01,01,00,00,00,00,00,\
05,0b,00,00,00,00,00,18,00,9d,01,02,00,01,02,00,00,00,00,00,05,20,00,00,00,\
23,02,00,00,00,00,18,00,ff,01,0f,00,01,02,00,00,00,00,00,05,20,00,00,00,20,\
02,00,00,00,00,14,00,fd,01,02,00,01,01,00,00,00,00,00,05,12,00,00,00,01,01,\
00,00,00,00,00,05,12,00,00,00,01,01,00,00,00,00,00,05,12,00,00,00
[HKEY_LOCAL_MACHINE\SYSTEM\CurrentControlSet\Services\Spooler\Enum]
"0"="Root\\LEGACY_SPOOLER00"
"Count"=dword:00000001
"NextInstance"=dword:00000001
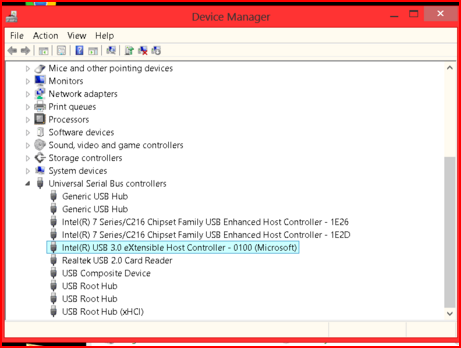
Device Manager has a bang on USB-IF xHCI USB Host Controller on Inspiron 7720, 7520
Problem:
DevMgr has a bang on USB-IF xHCI
USB Host Controller on Inspiron 7720, 7520
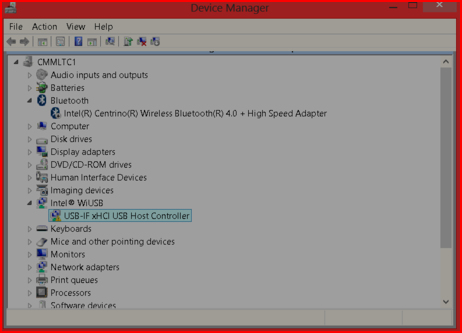
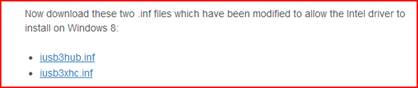
Resolution:Downloaded the ff.:iusb3hub.infiusb3xhc.inffrom http://plugable.com/2012/12/01/windows-8-and-intel-usb-3-0-host-controllers
And paste in on the Usb extracted folder location under Dell
> Drivers > Usb 3.0 Extracted Folder[Intel(R)_USB_3.0_eXtensible_Host_Controller_Driver\Drivers\Win7\x64\]


No ODD option in BIOS
How to add UEFI boot option?
1.
Attach the bootable device
you want to boot, and power on system to enter BIOS setup menu.
2.
Go to Boot section and choose
“Add Boot Option”.

3.
Type the Boot option name you
want, and select the boot device you attach on system. (Below example is USB
ODD.)

4.
Switch to “File Name” section
and select the EFI file you want to boot. Then enter.

5.
Click yes to save the profile.

6.
The boot option will appear in UEFI Boot list
under boot manager now.

7.
Enter boot manager via press F12, you can find
the UEFI boot option as well.

Subscribe to:
Posts (Atom)