Friday 26 June 2020

How to Make Windows Work Better on High-DPI Displays and Fix Blurry Fonts

High pixel density displays are now common on new Windows PCs, just as they are on smartphones, tablets, and Macs. But be careful what you wish for—many desktop apps still have problems on high-DPI displays.

Windows has offered DPI scaling support for long time, but many Windows desktop applications never took advantage of it. Microsoft is working on the problem, however, and so are many app developers. In the meantime here are some settings you can change to make applications look better.

Upgrade to Windows 10

RELATED: All the Ways You Can Still Upgrade to Windows 10 for Free

Windows 7 is still perfectly fine for many things, but it’s not fine on high-DPI displays. Windows 7 was never built for these super high resolution displays, and using them with Windows 7 will be a struggle. Microsoft dramatically improved high-DPI support with Windows 8, and Windows 10 is even better. Microsoft hasn’t stood still since releasing Windows 10, either. Updates like Windows 10’s Creators Update continue to add improvements to high-DPI scaling.

If you’re trying to use a high-DPI display with Windows 7, we highly recommend you upgrade to Windows 10. There are still ways to upgrade to Windows 10 for free, if you’re eligible.

Adjust Your Display Scaling Settings

If your laptop, convertible, or tablet came with a high-density display, Windows 10 will automatically choose an appropriate display scaling setting for it. However, you may want to adjust this setting yourself to make items appear larger and more readable, or make elements appear smaller so you have more screen real estate.

To change this setting on Windows 10, head to Settings > System > Display. Change the option under “Scale and layout” to your preferred setting. If you have multiple displays connected to your PC, you can select them at the top of this page and configure separate scaling levels for each. The ideal setting will depend on your the display and your eyes, so feel free to experiment. You can also click “Custom scaling” and set a custom percentage value between 100% and 500% from here, but Microsoft recommends you choose one of the default options in the list for maximum compatibility with applications.

RELATED: How to Fix the "Custom Scale Factor Is Set" Error on Windows

NOTE: if you have trouble adjusting these settings, you may want to check out this article—some software may be interfering with Windows’ scaling settings.

Your change will happen instantly. However, some older programs won’t notice the change until you sign out of Windows and sign back in.

Override System DPI Scaling for an Application with Blurry Fonts

Some third-party desktop applications will have blurry fonts and look bad when you enable DPI scaling. This is because Windows is just blowing them up to appear larger—it’s like if you zoomed into an image. The image would appear larger and more readable, but blurrier.

Theoretically, this applies only to “older” applications that aren’t aware of DPI scaling. In practice, this problem still applies to many common desktop applications, including Steam.

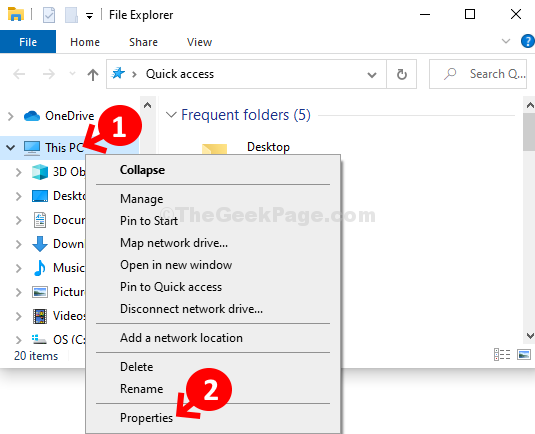
To fix this problem, you can adjust your DPI scaling settings for an individual application that isn’t working well. To do so, right-click the desktop application’s shortcut and select Properties. If the application is on the taskbar, right-click the taskbar icon, right-click the application’s name, and select Properties.

Click the “Compatibility” tab and check the “Override high DPI scaling behavior” option.

You’ll need to choose one of three high DPI scaling options from the dropdown as well. Here’s what they do:

  • Application: Windows will leave the application alone. This will disable DPI scaling for the application entirely, and it will appear tiny, but not blurry. This option was previously known as “Disable display scaling on high DPI settings”, and it does the same thing.
  • System: Windows will use its normal behavior. Applications that don’t respect system DPI settings will be “bitmap stretched” to appear larger so they’re more easily readable, but will often appear blurry. This is the default behavior.
  • System (Enhanced): Windows will scale applications in a more intelligent way. This option will result in crisp text and some other elements in applications that would normally appear blurry with normal System scaling. In the Creators Update, this only works with GDI-based applications. This new feature is why Device Manager and other system tools finally don’t have blurry text in the Creators Update.

After choosing your preferred option, click “OK”. You’ll need to close the application if it’s running and launch it once again for your changes to take effect.

If you’re not sure which option you want to use—for example, if you’re not sure whether the developer used GDI (the Windows Graphical Device Interface) for a desktop application—feel free to try various settings. Close the program and reopen it after changing your settings to see what works best for that application.

For example, for Steam, the “System (Enhanced)” scaling does not work properly. Steam will appear blurry even if you select this option. You’ll need to choose between “Application” scaling that makes Steam appear sharp but small, or the default “System” scaling that makes Steam appear large but blurry.

Windows 10’s new Universal apps, available in the Windows Store, scale nicely on larger high-DPI displays. But few developers have embraced Microsoft’s application platform, and Microsoft is still struggling to drag all those old desktop applications—including many desktop applications built into Windows itself—into the future. This should continue to improve over time as developers update their applications and Microsoft improves high-DPI support for desktop applications in Windows.

Saturday 16 May 2020

Fixed: There Is Not Enough Memory To Complete This Operation

Quite often, you may come across this error, “Not enough memory available to complete this operation. Quit one or more applications to increase available memory, and then try again“, or “There is not enough space available on the disk(s) to complete this operation.” This is a common error and it can be mainly due to two reasons.


It’s either because the extended partition of your machine is limited that does not allow you to create a new partition even if there’s free space, or because the memory is not being used in the correct manner. Are you installing software and apps, and saving data files to the system drive? That’s one example that you are not using the memory properly and rather filling up the drive. This is when you notice the error.

So, how do you fix this error? Let’s find out.


Solution: Through System Properties


Step 1: Press the Window key + E together on your keyboard to open the File Explorer. In the File Explorer window, right-click on This PC shortcut on the left side of the screen. and select Properties.


Win + E File Explorer This Pc Shortcut Right Click Properties


Step 2: In the System Properties window, click on the Change settings option under Computer namedomain, and workgroup settings section.


System Properties Computer Name, Domain, And Workgroup Settings Change Settings


Step 3: In the next window, click on the Advanced tab, and under the Performance section, click on the Settings button.


System Properties Dialog Box Advanced Tab Performance Settings


Step 4: Next, in the Performance Options window, click on the Advanced tab again, and under the Virtual memory section, click on Change.


Performance Options Advanced Tab Virtual Memory Change


Step 5: In the Virtual Memory window, uncheck the box next to Automatically manage paging file size for all devices. Now, click the radio button next to the Custom size section and the Initial size (MB) and Maximum size (MB) fields get active.


Virtual Memory Automatically Manage Paging File Size For All Devices Custom Size


Step 6: Next, check the Total paging file size for all devices section below and check the Recommended size. Here’s it’s showing 1394 MB. Now, set the Initial size (MB) field under Custom size to 1394 as per the recommended size below. Also, set the Maximum size (MB) field to the same value, 1394.  Click the Set button, and press OK to save and exit.


Check Recommended Size Set Intitial Size Maximum Size Set


That’s it, now restart your computer for the changes to be effective and you should not experience the Not Enough Memory error anymore.

Fix: Mail App Error Code 0x8000000b In Windows 10

Many of us prefer using mail apps on our Windows 10 PC instead of logging through web. While it’s pretty handy to use the apps, you may come across this error code – 0x8000000b when you are try to send an email.  So, when you press the Send button, your email tries to connect to the email server automatically for the server settings, but then the error pops up.


This error mainly arises due to syncing problem. Whether you prefer using a Gmail app or Yahoo Mail app, you will have to set them up first  in the Window 10 email app. And, then during the configuration, you may come across this error code – 0x8000000b.

But, fortunately, you can fix this error. Let’s see how.


Solution: Using The Mail App


Step 1: Click on the Start button on your desktop and type Mail in the search box. Click on the result to open Windows 10 Mail app.


Start Search Mail


Step 2: In the Mail app, click on the Add account option.


Mail App Add Account


Step 3: In the Add an account window, scroll down and select Advanced setup.


Add An Account Advanced Setup


Step 4: Next, under Advanced setup, select the Internet email option.


Advanced Setup Internet Email


Step 5: Under Internet email account, enter the below details one by one:

  • Enter your email address for the account which you want to add (here we added our gmail account – wearewriters2017@gmail.com).
  • Write your Gmail Username (we named it wearewriters).
  • Write your Gmail password.
  • Create an Account name. It can be anything. We set it as Gmail.


Email Address Username Passowrd Account Name


Step 6: Continue with the below steps for Internet email account one by one:

  • Keep the Send your message using this name field same as the Account name.
  • In the Incoming email server, enter imap.gmail.com.
  • Choose Account type as IMAP4 from the drop-down.
  • Set the Outgoing (SMTP) email server field as smtp.gmail.com:465.


Send Your Messages Usig This Name Incoming Email Server Account Type Outgoing Smtp Email Swerver


Step 7: Now, keep all the four options checked at the bottom as it is, and click on Sign in.


Keep All Four Options Checked Sign In


That’s it. Once you sign in this way, the error should not pop up anymore.

How To Allow Camera And Microphone in Google Chrome

If you prefer to use Google Chrome as your default browser, you may also want the websites you visit to have access to your machine’s camera and microphone. You may also want to access only specific websites and block a few from getting access to your Chrome’s microphone and camera.


So, yes, you can set up Google Chrome to allow websites to access your camera and microphone, and also for specific websites. You can also change the settings back as per your convenience. It’s very easy to set up and even block websites. Let’s see how.


Solution: Using Chrome Settings


Step 1: Open Google Chrome and click on the three vertical dots on the extreme upper right corner of the browser and click on Settings in the context menu.


Chrome Three Vertical Dots Settings


Step 2: In the Settings window, scroll down and under Privacy and Settings section, go to Site Settings. Click on the arrow next to it to proceed to the next page.


Chrome Settings Privacy And Security Site Settings


Step 3: In the Site Settings window, scroll down and under the Permissions section go to Camera. Click the arrow next to it to proceed to the next window.


Site Settings Permissions Camera


Step 4: Next, turn the slider on ,next to Ask before accessing (recommended) option. Turning this off will block the access to camera for the websites.


Camera Turn On Ask Before Accessing


Step 5: Now, go back to the Site Settings page, scroll down to select Sound and click the arrow next to it to proceed to the next page.


Site Settings Sound


Step 6: In the next page, turn the slider on next to the Allow sites to play sound (recommended) option. Turning this off will block the access to sound for the websites.


Sound Turn On Allow Sites To Play Sound


Step 7: Return to the Site Settings page, scroll up and select Microphone. Click the arrow next to it to proceed to the next page.


Site Settings Microphone


Step 8: Now, from the drop-down, select the appropriate microphone. You can test all the available options to find out which one works best and select that one. For instance, here we selected the 1st option  which is the Default-Microphone (2- High Definition Audio Device).


Microphone Select The Appropriate Microphone


Step 9: Next, turn the slider on next to the Ask before accessing (recommended) option. Turning this off will block the access to microphone for the websites.


Microphone Turn On Ask Before Accessing (recommended)


That’s about it, and your Google Chrome can now access the camera and microphone for all websites.

Fix VLC Crash Reporting Error ” Media Player Just Crashed” Error

VLC Media Player is undoubtedly one of the favorites for those who love to play audio and video files very often. However, the player is also prone to some crashes and errors, and one of which is “Ooops: VLC media player just crashed“. This is a common error and so, you may experience this any random time, for any random file (audio/video).


Crashes can be alarming, but there’s not much to worry, since most of them can be fixed easily and so does this error. Let’s see how.


Solution: Using Tools and Preferences


Step 1: Open your VLC media player and click on Tools on the top of the window. Then, click open the Preferences option from the context menu.


Vlc Media Player Tools Preferences


Step 2: In the Simple Preferences window, click on Input/Codecs on the top and then go to the Hardware-accelerated decoding option. Here, click on the drop-down and set it to Automatic. Click on the Save button at the bottom.


Simple Preferences Input Codecs Hardware Accelerated Decoding Automatic Save


Step 3: Now, again go to Tools and click on Preferences as shown in the Step 1. In the Simple Preferences window, click on the Video option on the top. Now, go to the Output option and set the field to OpenGL video output. Click on the Save button to save the changes and exit.


Simple Preferences Video Output Opengl Video Output Save


That’s all. You are done with the change in settings and now, you should be able to play your favorite audios and videos without the error showing up.

Fix: Steam Api Dll Missing Error In Windows 10

Steam spi dll is a known error experienced for gamers who prefer playing games from Steam, which is a leading game provider online. Steam features an online library of games and to play these games it has to communicate with steam_api.dll. This is when you notice the error.


The steam_api.dll files usually get changed while playing a game and this changed file is picked up by an antivirus software as a virus threat and subsequently stores it for quarantine. This can happen either when you have been installing a game on the computer or it got caught as a virus in the anti-virus scan. Besides, the error can also appear on licensed games.

However, thankfully, this error can be fixed/ Let’s see how.


Solution: By Downloading steam_api.dll


Step 1: Open Google and search for steam_api.dll download and click on the 1st result.


Google Search Steam Api Dll Click On 1st Result


Step 2: Now that you are on the download page, scroll down to the download section where you will see a list of downloads. We selected the 1st one for 32-bit architecture. This download is also fit for 64-bit architecture. Click on the Download link.


Download Page Select The 1st Download Link Click To Download


Step 3: Once downloaded, click on the download to Open File. It will take you directly to the saved location in the File Explorer.


Click To Open File File Explorer Location


Step 4: Now, press the Windows key + E to open File Explorer. In the File Explorer window, click on the View tab on the top and below that click on Options on the right.


File Explorer View Tab Options


Step 5: In the Folder Options dialog box, click on the View tab and under Advanced settings, go to the Hidden file and folders section. Under this see if the Show hidden files, folders, or drivers is selected. If not select the radio button next to it, click Apply and OK to save the changes and exit.


Folder Options View Hidden Files And Folders Show Hidden Files, Folders, And Drivers Apply Ok


Step 6: Now, click on This PC. On the right side of the pane, double-click on the C drive [OS (C:)]. 


Win + E File Explorer This Pc C Drive


Step 7: Next, scroll down and double-click on Windows.


C Drive Windows

Step 8: Now, if your computer is a 64-bit version, scroll down and double-click on System32. If it’s a 32-bit version, double-click on SysWOW64. Here we double-clicked on System32 since our machine is a 64-bit version.


Windows Folder System32 For 64 Bit Version


Step 9: Now, copy steam_api.dll from the Downloads folder to the System32 folder.


Copy Steam Api Dll From Downloads To System32


Step 10:  Next, click on the Continue button in the prompt to continue with the copying process.


Prompt Continue


That’s it. The steam_api.dll is saved in the System32 folder and now, you should not encounter the error again while trying to play a Steam game.