BitLocker can be disabled using the following modes in the Imaging computer,
1) Through Windows Command Prompt
Ensure that you have logged onto Admin user account to disable bitlocker encryption. Follow the steps given below to disable bitlocker encryption using Command Prompt.
- Open Command prompt in Administrator mode.
- To check the status of BitLocker encryption in the system execute the command given below.
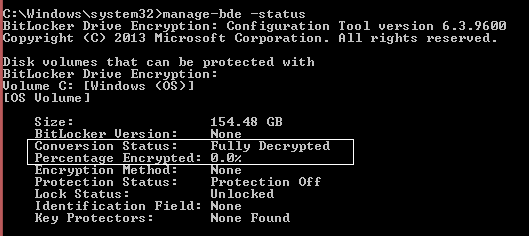
manage-bde -status
- Ensure that the results for the required drives(C:, D:, etc) are as follows.
Conversion Status : Fully Decrypted
Percentage Encrypted : 0.0%
- If the result is "Percentage Encrypted : 100.0%", decrypt the BitLocker for the required drives using the commands given below.
manage-bde -off <drive letter>:
E.g.: manage-bde -off C: - Check the BitLocker status after disabling using the command (manage-bde -status) and ensure that the "Percentage Encrypted : 0.0%", before proceeding with the image creation process.
2) Through Windows GUI mode
Ensure that you have administrator credentials to disable bitlocker encryption. Follow the steps given below to disable bitlocker encryption in GUI mode,
- Click Start, click Control Panel, click System and Security, and then click BitLocker Drive Encryption.
- Look for the drive on which you want BitLocker Drive Encryption turned off, and click Turn Off BitLocker.
- A message will be displayed, stating that the drive will be decrypted and that decryption may take some time. Click Turn off Bitlocker / Decrypt the drive to continue and turn off BitLocker on the drive.
You can ensure if the BitLocker encryption is removed by checking if the Bitlocker lock icon is removed in the particular drive and by accessing the particular drive. You can repeat the same steps to disable Bitllocker Encryption in other drives.
3) Through Windows Powershell mode
To disable Bitlocker encryption in Windows Powershell mode, Windows Power shell must be installed in your system. If not download & install proper Windows Powershell version from Microsoft website. Also check the Powershell System requirements before proceeding installation.
Note: If the partition with the operating system contains any automatic unlocking keys, the cmdlet to disable bitlocker encryption will not work. You can use the Clear-BitLockerAutoUnlock cmdlet in Powershell window to remove all automatic unlocking keys to disable BitLocker for the partition.
Disable Bitlocker for all volumes
- Open Windows Powershell in Administrator mode and execute the following commands
- PS C:\>$BLV = Get-BitLockerVolume
- PS C:\>Disable-BitLocker -MountPoint $BLV
- Verify the decryption process by using below method
- Execute command: PS C:\> Get-BitlocerVolume
- Check decryption progress in "Volume Status" & "Encryption Percentage". Also these values must be "FullyDecrypted" & 100% to confirm the decryption completion.
- Progress can be seen in Control Panel -> System and Security -> BitLocker Drive Encryption.
or
- Open Windows Powershell in Administrator mode
- Disable-BitLocker -MountPoint "C:"
- Verify the decryption process by using below method
- Execute the command: PS C:\> Get-BitlocerVolume -MountPoint "C:"
- Check decryption progress in "Volume Status" & "Encryption Percentage". Also these values must be "FullyDecrypted" & 100% to confirm the decryption completion.
- Progress can be seen in Control Panel -> System and Security -> BitLocker Drive Encryption .
or
No comments:
Post a Comment