Around a decade ago, we used to have very limited storage space on computers. With time, the hard drives grew in capacity at a very fast pace. But with time, the size of videos, images, games, applications and all other types of files also increased. The problem which bothered Windows users a decade ago still does the same to Windows 10 users. Lack of free space.
Although the issue is still the same, Windows 10 users have a lot of ways to clear up their hard drive. Windows 10 includes many tools which we can use to clear up files including cache, applications and games which we never use. Many users nowadays opt for an external hard drive. But what they don’t realise that their own computer has a lot of usable space which is being captured by junk files.
How to Clean up Hard Drive
Most of the Windows users don’t even know about the tools included in Windows 10 that can improve their computer’s health. The tools to clear up the hard drive space will also make your computer work faster, along with giving you more space for saving files. In this guide, we will help you clean up your hard drive, in different ways. Simply follow the methods and their steps to fasten your computer along with making some free space on hard drive.
1. Use Storage Sense to Delete Junk Files
Windows 10 comes with an awesome tool to clear up hard drive space captured by junk files known as Storage Sense. You can simply set its settings to clean up space automatically in every few days. Storage Sense automatically clears up the Recycle Bin and the files stored in your computer’s Downloads folder. Here’s how you can set it up.
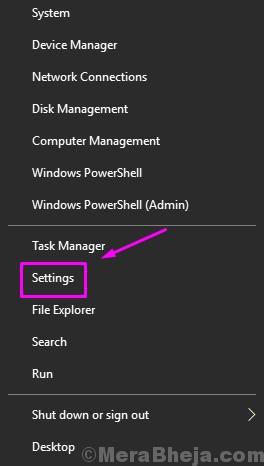
Step 1. Right-click on the Start menu button and select Settings.
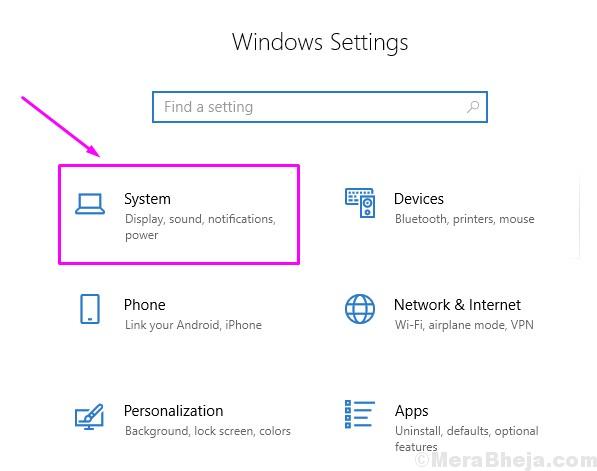
Step 2. Select System.
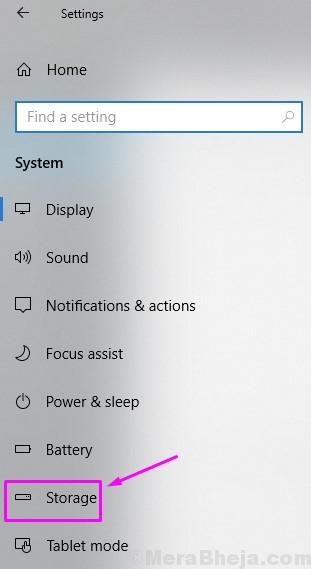
Step 3. Go to Storage.
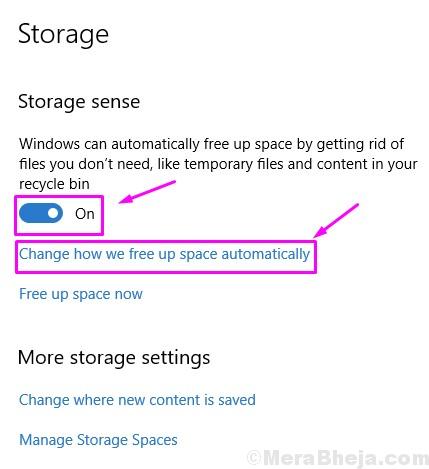
Step 4. You will see Storage Sense here. Turn it ON, and select Change how we free up space automatically.
Step 5. Mark the box beside Delete temporary files that my apps aren’t using.
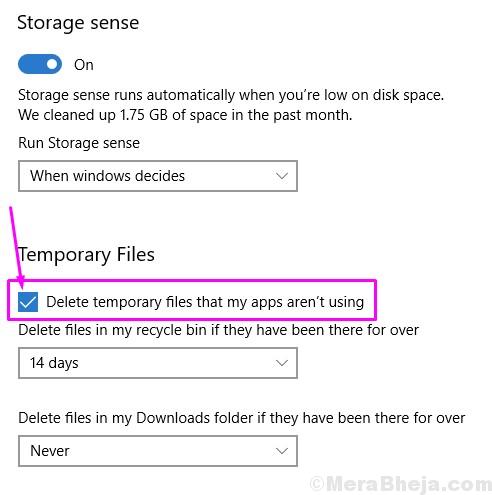
Step 6. Now, you can select in how many days Storage Sense should clear up the Recycle Bin and files stored in the Downloads folder. You can select from 1 day, 14 days, 30 days and 60 days.

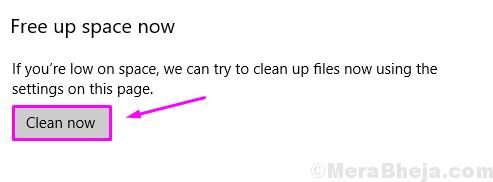
Step 7. You will also see a Clean now option at the bottom. If you want to clear up space currently, simply click on it and Storage Sense will delete junk files.
If you have installed a Windows 10 feature update recently (within last 10 days), after clicking on Clean now, you will be able to select and delete the previous installation of Windows 10.
Step 8. You can use Storage Sense to clear the junk files anytime manually. But, if you want Storage Sense to clear up junk files automatically whenever your computer is running low on space, you can select it too. Select the number of days under Run Storage Sense by clicking on the drop-down menu. You can select from Every day, Every week, Every month and When Windows decides.

2. Uninstall Useless Games and Applications
In this next method, we will uninstall useless games and applications which takes a lot of space. Many of these come preinstalled, and along with taking up space, they also affect your computer’s RAM space which slows down your computer.
If you like to play games, the other (pre-installed) games slow them down. Deleting them will improve your computer’s health and your gaming experience as well. Here’s how to do it.
Step 1. Right-click on the Start menu button and select Settings.

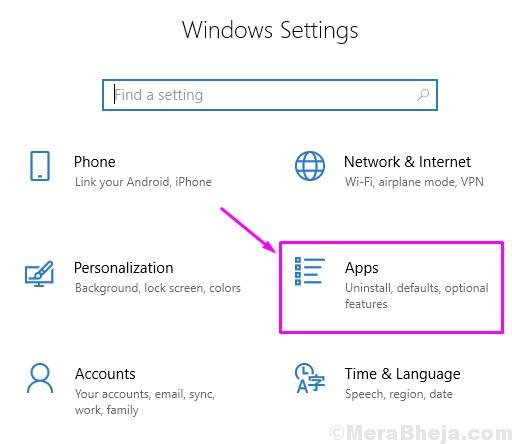
Step 2. Select Apps.
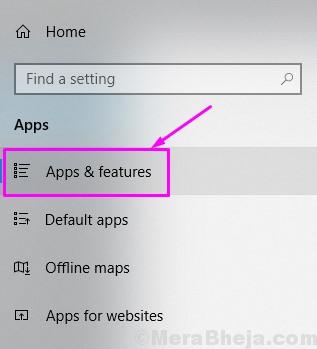
Step 3. Go to Apps & features.
Step 4. Now, click on the drop-down menu beside Sort by and select Size.
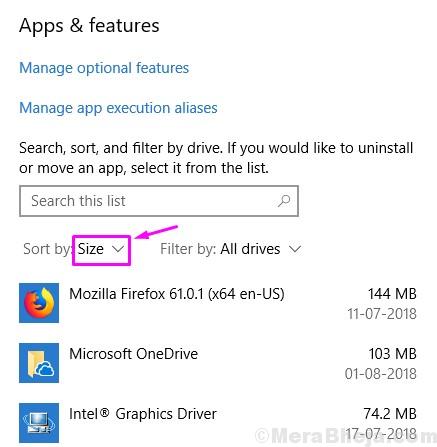
Step 5. You will see the names of games and applications, along with their size. To delete useless apps and games, simply click on them and then select Uninstall. Click on Uninstall again to remove them from your computer.

Step 6. Repeat the above step to remove more useless games and apps.
3. Use Disk Cleanup to Remove Temporary Files
Disk Cleanup is a disk maintenance application which has been in Windows since Windows 98. Using this application, you can free up the disk space on your computer’s hard drive by removing unnecessary files. Since Windows 10 April 2018 update (version 1803), this application’s functions can also be accessed from the Settings app and Control Panel. We will show you different ways to use this feature in Windows 10.
From Settings
To clear up the temp files from Settings, follow the steps mentioned below.
Step 1.Right-click on the Start menu button and select Settings.

Step 2. Go to System.

Step 3. Select Storage.

Step 4. Now, click on Free up space now.
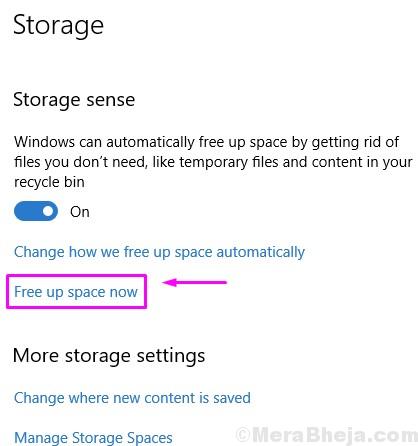
Step 5. After the last step, it might take a few seconds to scan your computer for temp files. When the process is done, you will able to delete different types of temp files. You can select the ones you want to delete from these options by marking the box beside them.
- Windows upgrade log files
- System created Windows Error Reporting files
- Windows Defender Antivirus
- Windows Update Cleanup
- Thumbnails
- Temporary files
- Recycle Bin
- Temporary Internet Files
- Delivery Optimization Files
- DirectX Shader Cache
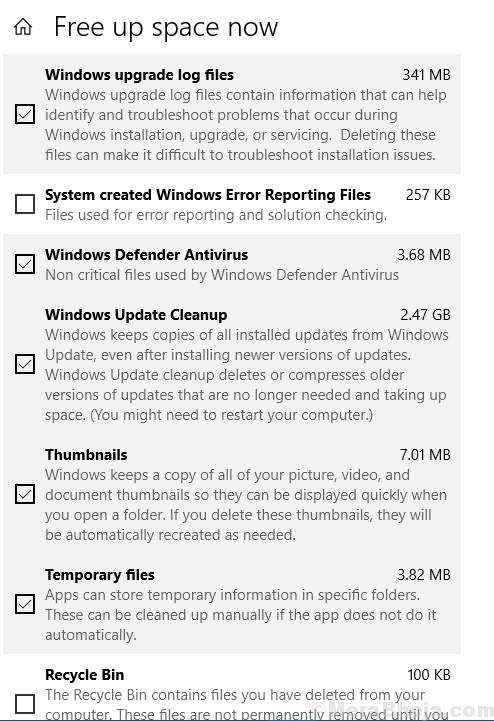
Step 6. After marking the options in the last step, click on Remove files.
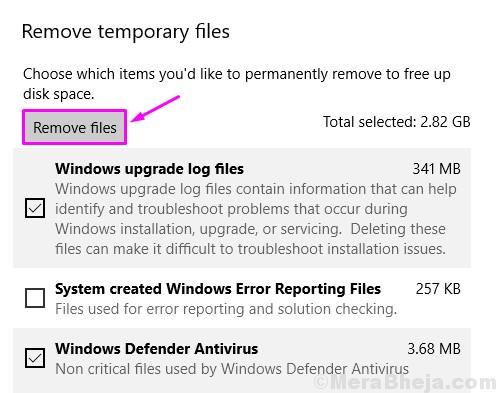
This will remove temp files from your computer.
From Control Panel
To clear up temp files you can use Disk Cleanup from Control Panel.
4. Delete System Files
Using Disk Cleanup to delete temporary system files, follow these steps.
Step 1. In the first step, you will have to go to your File Explorer.
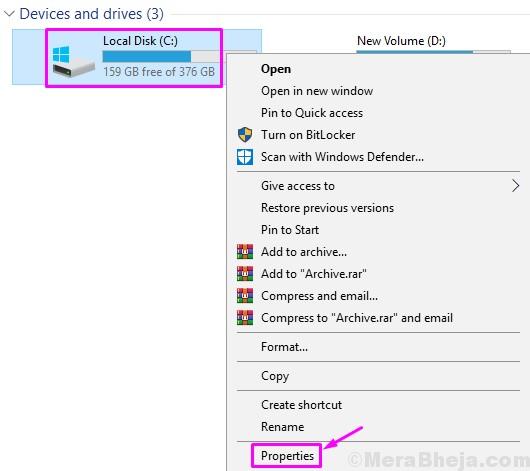
Step 2. Now, go to This PC from the left side. Right-click on the drive which you want to clear up and click on Properties.
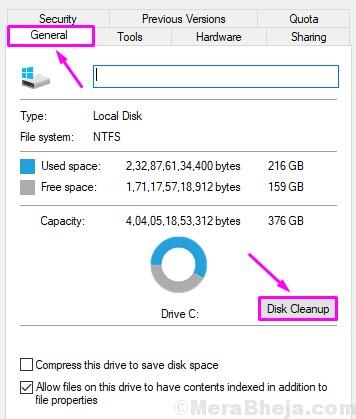
Step 3. Under the General tab, select Disk Cleanup.
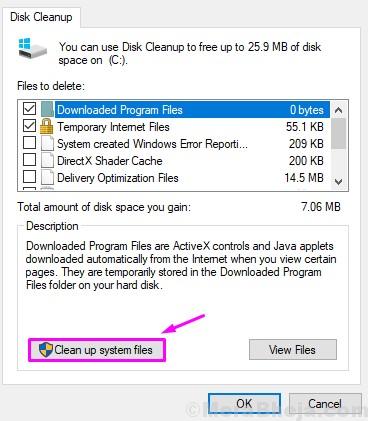
Step 4. In the next step, click on Clean up system files.
Step 5. Now, you can select the temp files you want to delete from the following options by marking the box beside them.
- Windows Update Cleanup
- Windows Defender Antivirus
- Windows upgrade log files
- Downloaded Program Files
- Temporary Internet Files
- System created Windows Error Reporting
- Delivery Optimization Files
- Device driver packages
- Recycle Bin
- Temporary files
- Thumbnails
- Temporary Windows Installation Files.
- User file history
- Previous Windows installation(s).
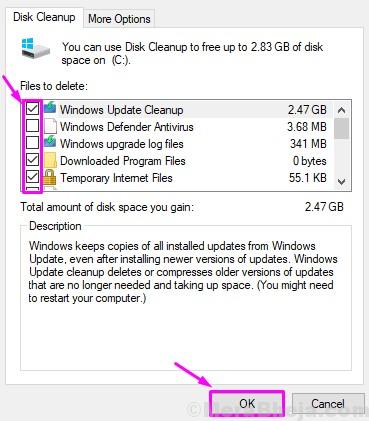
Step 6. Click on OK to start the cleanup process. If asked for confirmation, click on Delete Files.
This will delete the temporary system files from your computer.
5. Delete System Restore and Shadow Copies
Windows 10 comes with System Restore feature. This feature creates a backup of your drives by creating Shadow copies of them. Windows 10 can create a number of shadow copies. You can delete these shadow copies, except the recent restore point file. Here’s how to do it.
Step 1. Open File Explorer.
Step 2. Go to This PC on the left side. Now, right-click on the drive which you want to clean up and select Properties.

Step 3. Under the General tab, select Disk Cleanup.

Step 4. Click on Cleanup system files.

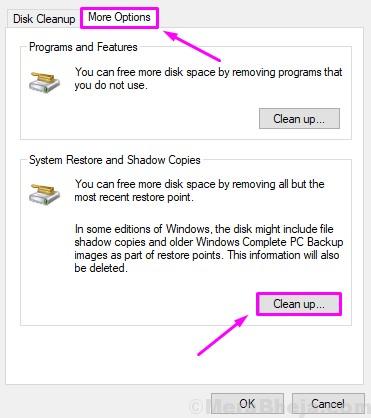
Step 5. Now, go to tab More options and click on Clean up under System Restore and Shadow Copies.
Step 6. You will see a warning message. Click on Delete to delete shadow copies of restore points except for the last restore point.
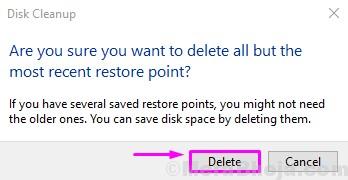
This will free up a lot of space on your hard drive.
6. Disable Hibernation Mode
The Windows 10 includes a Hibernation feature which keeps your open programs and files on the hard disk when you turn off your computer. When you start your computer back again, you will be greeted with the same open files and programs.
Hibernation is a good feature, but it takes a lot of space on the hard drive to save open files and programs. It can take up to 3 GB of hard drive space. So, in the first method to clear up space in hard drive, we will disable hibernation mode. Follow the steps to do so.
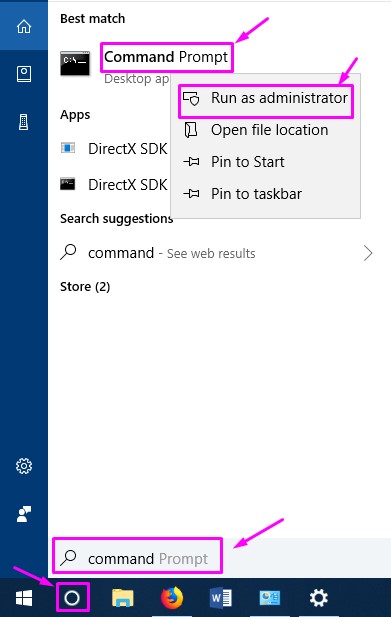
Step 1. Go to Cortana and type Command Prompt. Right-click on Command Prompt and select Run as administrator.
Step 2. In the Command Prompt window, type the following command and press Enter to disable Hibernation.
powercfg /hibernate off
The last step will disable the hibernation feature on your computer and you will not be able to use it. This will clear a good amount of hard drive space for you to use. If you wish to use hibernation mode again, simply use the following command in Command Prompt to enable it: powercfg /hibernate on.
7. Store Files in Cloud
You can save your pictures, documents, videos and music on Microsoft’s OneDrive. OneDrive is Microsoft’s cloud storage service, where you can save and access your computer’s files using its feature named Files On-Demand. With this feature, the files get saved on OneDrive right from your File Explorer, which saves up a lot of space on your computer as it doesn’t take up hard drive space.
If your computer is low on space, simply upload the files on OneDrive cloud. You can download them whenever you need.
Start OneDrive’s Files On-Demand
To start OneeDrive’s Files On-Demand feature, follow these steps.
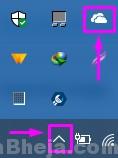
Step 1. Click on Onedrive from notifications.
Step 2. If you haven’t signed in on it, click on Sign in and sign in with your email id and password. If you have already done that, skip this step.
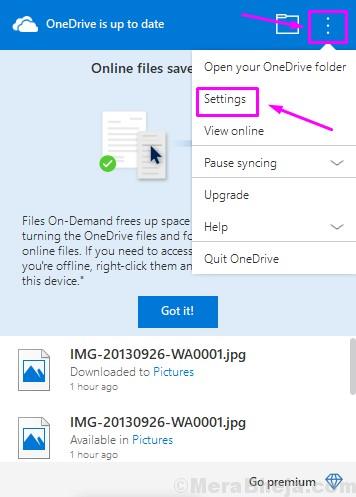
Step 3. Now, you need to click on the three vertical dots (menu button) and then click on Settings.
Step 4. Go to the Settings tab and mark the box beside Save space and download files as you use them under Files On-Demand. Click on OK.
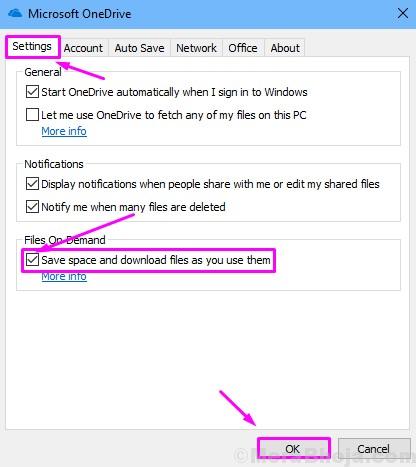
You have successfully enabled the Files On-Demand feature. Now, just move the files to OneDrive’s folder and they will be uploaded to cloud.
Save Space with Files On-Demand
Now, to free up space, follow these steps.
Step 1. Go to File Explorer
Step 2. Go to the OneDrive folder.
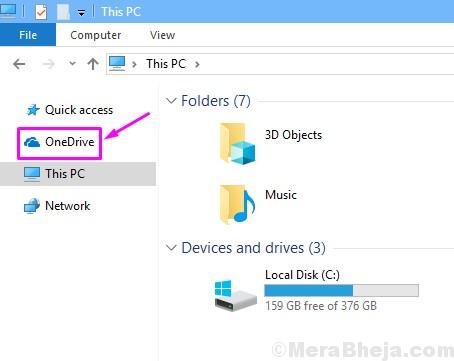
Step 3. Here, select the folders and files which are taking up most of the space.
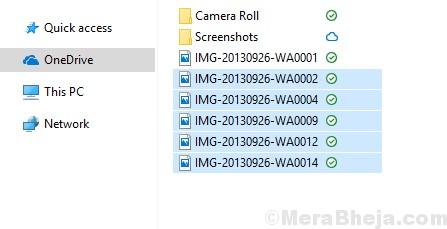
Step 4. Right-click on the selection. Select Free up space.
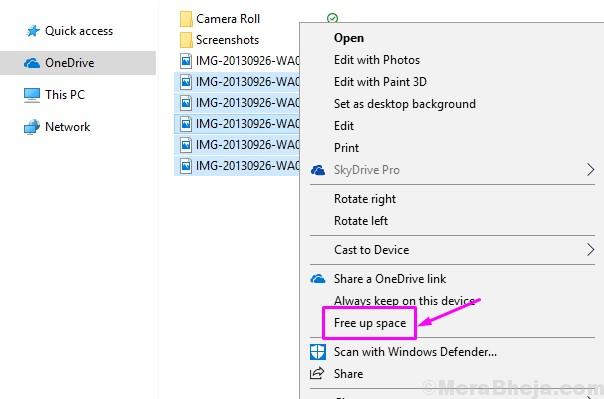
Now, the selected files will not take space on your computer’s hard drive. Whenever you need them, simply access them from OneDrive folder and then OneDrive will download them and open it for you.
8. Compress the Windows 10 Installation using Compact OS
The Compact OS is a tool designed by Microsoft to compress Windows installation, along with app files. This reduces the space they take on your hard drive, which makes some more space for you. This tool was designed for low-end devices which come with less storage. But, you can also use this to create some free space, and it also doesn’t have any impact on your computer’s performance. If you feel it’s affecting your computer in any way, you can undo it.
Step 1. Go to Cortana and type Command Prompt. Right-click on Command Prompt in results and click on Run as Administrator.

Step 2. Now, type the following command in Command Prompt window and press Enter.
compact.exe /compactOS:always
After entering the command, Windows will take around 10 to 15 minutes and it will compress installation files and applications. This will free up about 2 to 3 GB of hard drive space.
If you want to revert this process, simply enter the following command in Command Prompt:
compact.exe /compactOS:never
9. Move Files, Games and Apps to External HD (Hard Drive)
If the above-mentioned methods didn’t clear up enough space for you, and you still need more free space, then you can simply transfer your files, games and applications to an external hard drive. You will have to buy an external hard drive. You can buy one with size according to your need.
Simply connect the external hard drive to your computer using the USB cable provided with it, and move your files in it.
Save Files to External Hard Drive Automatically
Windows 10 comes with a feature using which the new files and new applications will be automatically saved on the external hard drive.
Step 1. Connect the external hard drive to your computer. Now, right-click on the Start menu button and select Settings.

Step 2. Select System.

Step 3. Go to Storage.

Step 4. Click on Change where new content is saved under More storage settings.
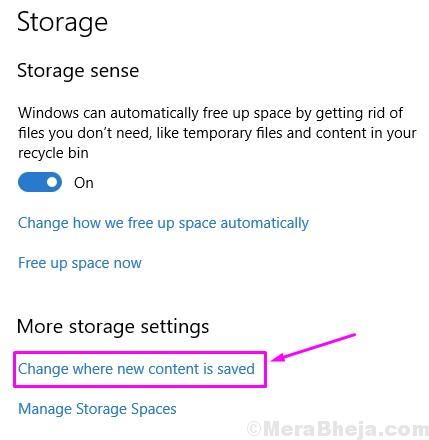
Step 5. Now, you can change the location for new documents and applications to be saved. Simply select your external hard drive from drop-down menus. You can also select a new location for Music, Videos, Photos, Movies, TV Shows and offline Maps from here.
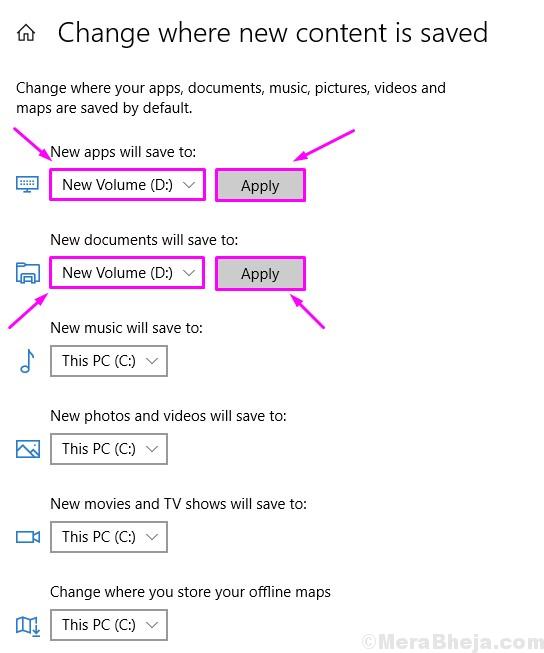
Step 6. After selecting the new location, click on Apply.
Now the new documents and applications will be saved on your external hard drive.
Move Installed Games and Apps
After setting up the location for new documents and applications, we will show you how to move already installed games and applications to your external hard drive.
Note: You can only move apps and games installed from Microsoft Store.
Step 1. Right-click on the Start menu button and select Settings.

Step 2. Go to Apps.

Step 3. Select Apps & features.

Step 4. Now, click on a game or an app which you want to move to external hard drive. Now, click on Move.
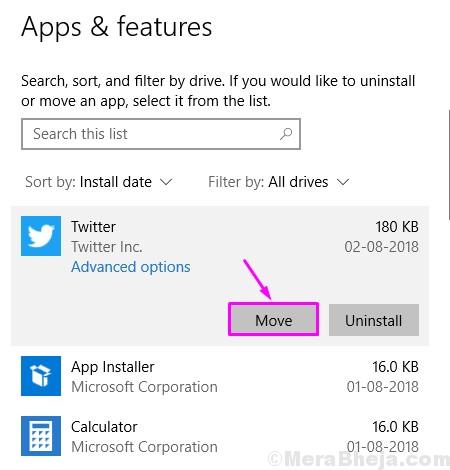
Step 5. Now, select the new location for the game or app from the drop-down menu and click on Move.
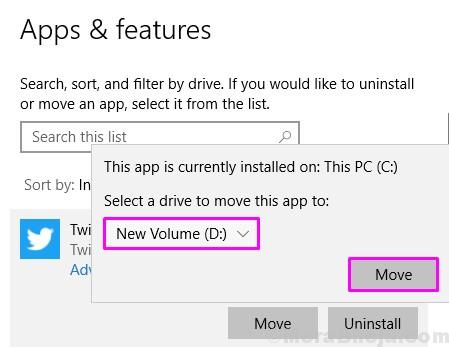
Repeat the steps for all the games and apps you want to move to your external hard drive.
10. Clear up the Recycle Bin
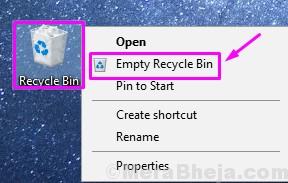
When you delete any file, it goes to your Recycle Bin, which can take up a lot of space. Many of us forget to clear up the Recycle Bin. To clear up the Recycle Bin, simply right-click on it and select Empty Recycle Bin. When you are asked with a warning to permanently delete the files, click on Yes. This will clean up the Recycle Bin, which will save you a lot of space.
We hope we were able to help you save a lot of hard drive space. If you have any problems regarding any method, or if you have any new methods to make more space, please mention them below in comments.
No comments:
Post a Comment