Windows Key is a multi function key which eases use of many functions. Starting from accessing the Start menu without using the mouse to launching various Windows functions, settings, utilities can by done with the help of Windows key.
But, when you are gaming, Windows key can be very problematic. In this article, we will discuss various ways to disable the Windows Key on your keyboard.
Method 1: Disable the Windows Key from Registry Editor-
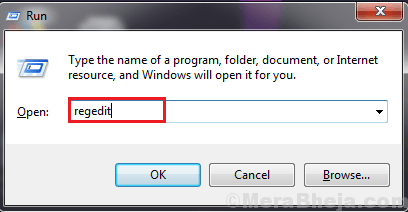
1. Press Windows Key+R to launch Run, and type “regedit” and hit Enter. Registry Editor window will be opened.
2. Now, in the Registry Editor window, click on “File” and then click on “Export“. Save the exported registry to a favorable location of your choice to take backup. If any thing goes wrong you can just merge it to your original Registry directory.

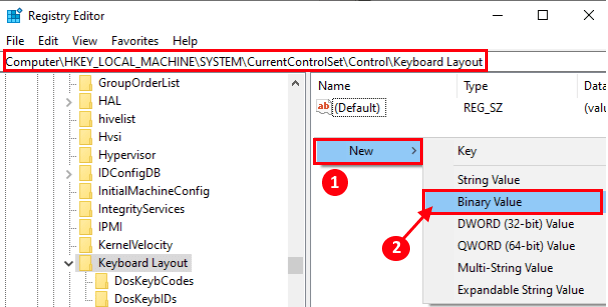
3. Now, on the Registry Editor window, navigate to this location-
Computer\HKEY_LOCAL_MACHINE\SYSTEM\CurrentControlSet\Control\Keyboard Layout
Now, right click on the right side space, and click on “New” and then on “Binary Value“.
Rename the Binary Value as “Scancode Map“.
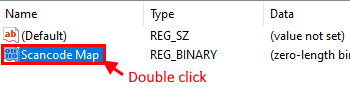
4. Double click on “Scancode Map“.
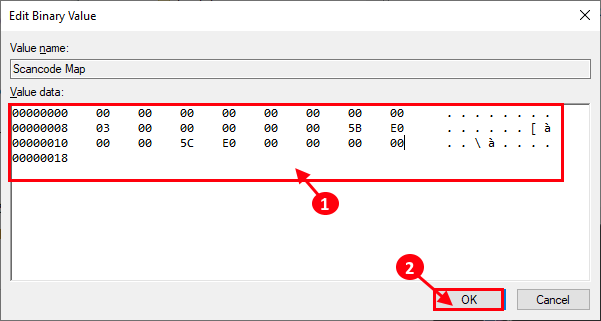
5. Now, under the “Value Data” section, write this values “00000000000000000300000000005BE000005CE000000000” and click on “OK“.
[NOTE– You will not be able to copy and paste this in the Value Data tab. So, you will have to manually enter these values. After entering the values, check the order of the value with the following screenshot. Any kind of mistake during the input can lead to fatal system error.]
Now, close Registry Editor.
After rebooting, Windows button should be disabled on your computer.
If you want to use the Windows button again, just “Scancode Map” from the Registry Editor.
Method 2: Use AutoHotkey-
AutoHotkey is an scripting application which can be used for creating custom keyboard shortcuts, disabling any key on keyboard.
1. Download the AutoHotkey application on your computer.
2. Now, double click on “AutoHotkey_1.1.32.00_setup” application to install the AutoHotkey on your computer.
3. Now, in the installation page, click on “extract to” to choose where to extract the files or you can just click on “Express Installation” to install AutoHotkey in a default location.

4. Click on “Exit” to exit the installation.
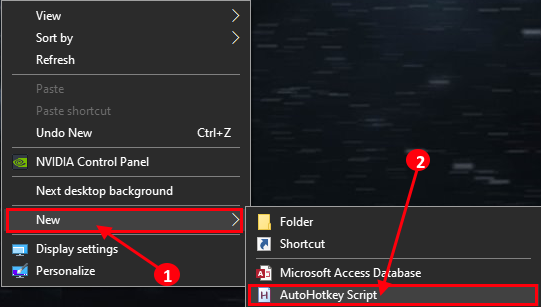
5.Now, in the desktop, right click in any empty space and click on “New“and then click on “AutoHotkey Script“.
6. Now, again right click on “New AutoHotkey Script” and click on “Edit Script“.

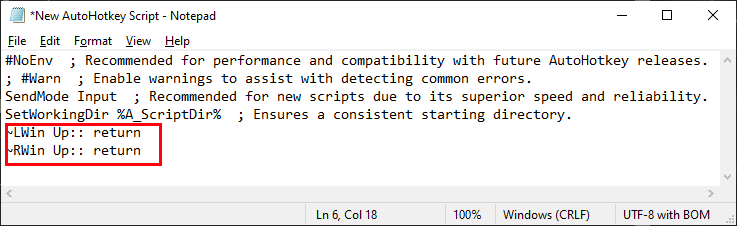
7. Now, copy and paste this two lines in the script.
~LWin Up:: return
~RWin Up:: return
Press Ctrl+S to save the script.
Close the Notepad.
8. Now, just double click on the “New AutoHotkey Script” and it will be running on your computer.
Reboot your computer. After rebooting, check if Windows key is disabled or not.
[IMPORTANT– Please remember, some games (online multiplayer) can detect this background script as a cheating script. You should check if AutoHotkey script is white-listed in developer’s site. ]
Method-3 Disable Windows key from your keyboard-
If you are using a gaming keyboard, then you can easily disable Windows key. Just access the keyboard settings on your computer, and you will be able to enter “Gaming Mode“. This will temporarily lock the Windows key on your computer till you are in Gaming mode.
In many gaming keyboard, there are individual settings to disable the Windows Key. You can find the particular software of your keyboard (where you can disable the Windows key) in your manufacture’s website.
Method- 4 Another method of disabling Windows key using Registry Editor-
1. Press Windows Key+R to launch Run, and type “regedit” and hit Enter. Registry Editor window will be opened.
2. Now, in the Registry Editor window, click on “File” and then click on “Export“. Save the exported registry to a favorable location of your choice. If any thing goes wrong you can just merge it to your original directory.
3. Now, on the Registry Editor window, navigate to this location-
HKEY_CURRENT_USER\Software\Microsoft\Windows\CurrentVersion\Policies\Explorer
Now, on the left pane click on “New” and then click on “DWORD (32-bit value)“.
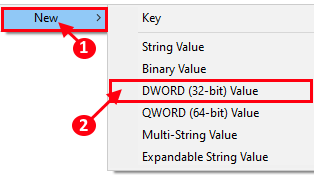
Rename it as “NoWinKeys“.
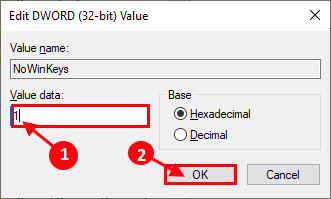
4. Now, double click on “NoWinKeys“.

5. Now, change the Value Data as “1” and click on “OK” to save the changes.
Close Registry Editor.
Restart your computer to save the changes. After rebooting Windows key should be disabled on your computer.
If you want to use the Windows key again, just delete “NoWinKeys” from the Registry Editor.
Method- 5 Use Group Policy Editor-
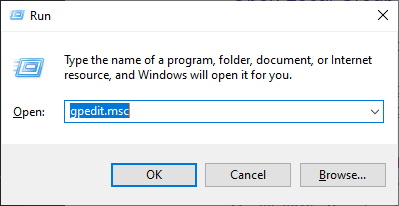
1. Press Windows key+R to launch Run, and type “gpedit.msc” an d hit Enter. Group Policy Editor window will open.
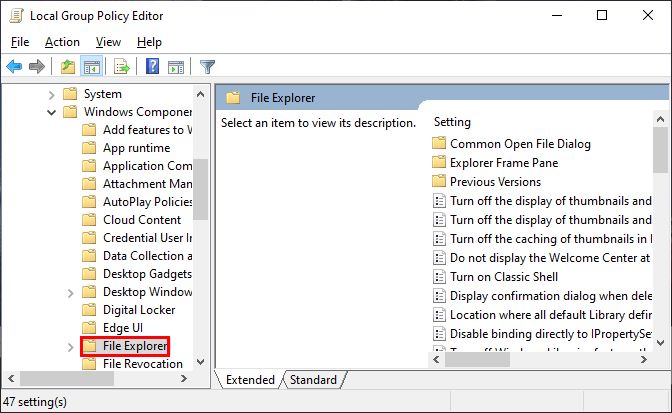
2. Now, on the left pane, navigate to this location-
User Configuration > Administrative Templates > Windows Components > File Explorer
Now, scroll down to find “Turn off Windows key hotkeys” and double click on it.
3. Now, in the Turn off Windows key hotkeys window, click on “Enabled” and click on “Apply” and then click on “OK“.

Restart your computer to save the changes and after rebooting Windows key on your keyboard should be disabled on your computer.
No comments:
Post a Comment